8.17.2008

The last weekend devoted entirely to the kitchen. Ever.

Ta-da! What you're looking at, friends, is a completed kitchen. I made the big push last week and all through this weekend to knock the project out and I am beyond proud to say that I did it.
Yesterday I finished painting all of the moulding and doing necessary touch up, and today was the oh-so-precise job of installing the cabinet hardware, installing the piece of butcher block counter top, and installing under-cabinet lighting (I do have one thing left to do with the lighting, I need something to gather and hide the cords... right now, painter's tape is hiding them beneath the cabinets).
I could tell many stories, but I'll let the pictures do the talking. I'm also working on a slides show that highlights the past 3 and a half months and will try to embed that here. Until then, I'm going to go and bask in the glow of the under-cabinet and hood surface light glow of my NEW KITCHEN!

8.11.2008

Take note to keep your eyebrows

While I haven't been posting as frequently, it doesn't mean I haven't been learning and taking multiple notes--as I often do. Here are a few important ones:

Note to self: Even if IKEA says it's a good idea to tape around where you're caulking to keep the lines clean. Don't. Caulk is easy to clean up. And if you tape it, then it will stick to the tape so that when you remove the tape you no longer have a clean line. And then you need to re-caulk. Blarg!

Note to self: When installing a gas stove and checking to see if it's connected. DO NOT lean over the burner to smell for gas flow if you have the knob held on ignite and have had it there for at least ten seconds. Just because it hasn't ignited yet, doesn't mean that it won't... right when you have your face over the burner.

Note to self: When installing a gas stove yourself, don't. Get a professional to do it.

Kitchen? What kitchen?

Hello, friends! Have you missed the DomestiKat? I know it's been a month since I've posted, and I don't have pictures really, because I've been working on the time-consuming and minute details and it's really hard to tell a difference in things. Oh, and I'm lazy.

Since the last post after installing my cap and crown mouldings, I've done a lot of little things. Ooh, except one big thing, the microwave debacle got all straightened out. So I have one cooking element, I have yet to use it, but it does send me little messages like, "Have a nice day," "Do you want to set the clock," "Your food is done," and "Nice kitchen!" Okay, I may be putting words into its display, but anyway...

I sit here typing with paint all over my hands (and residual caulk in the crevices). Over the weekend, I caulked every single solitary crack, seam, and space. Wow is caulk amazing! And then I primed all of the moulding (before that and actually before caulking, I taped everything... which took two rolls of tape). Tonight I painted all but the baseboard mouldings. For those of you keeping track at home, here's what I have left:
1. Paint the baseboard moulding
2. Touch up wall paint--and maybe do some re-caulking
3. Install pulls and knobs
4. Install butcher block
5. Install gas stove (rather get a professional to do it, but that's another post)
6. Oh, and move back in to the kitchen.

Yes, it means that it is highly likely that the kitchen will be completed this weekend, and some of you have heard me say that for the past month, but this time I'm not crying wolf... I mean it.

7.14.2008

Cap and crown

This past weekend, I installed cap moulding on top of all of the cabinets. And I also had a friend (whom I owe big time) come over and help install the crown moulding.They need to be caulked, primed, and painted... they'll all eventually be white to match the other mill work and cabinets in the house/kitchen.
My ceilings are 9'5" tall, but for some reason all this moulding makes them feel so much taller. When I walked into the kitchen this morning I felt like I was in the foyer of the haunted house at Disney World--you know how the room grows taller as your standing there? Either that, or I was a Lilliputian in a kitchen made for Gulliver. Seriously, I've created a kitchen for big people. Five foot ten never felt so small.

7.08.2008

Long lost update

Oh my heck! Has it really been two weeks since I've updated? My how time flies when you still can't cook for yourself. But I'm getting so so so close. And the fact that I can't cook is not my fault--either the manufacturer or the appliance store provided me with the wrong mounting plate for my over the range microwave. Too bad I took a ton of time to meticulously mount it to my wall and tile all around it. Blarg!

But no worries, a new one is coming (and it better be soon), so I can install it and then my stove, finally.

In the meanwhile, I'm to the point in the kitchen where I'm just doing detail work--and I've found where the devil is hiding out, for sure!

Since my last post here's what's happened:

1. Grouted the tile--not nearly as fun as laying the tile, but it looks really nice (will post picture of this soon)
2. Got water! Yay! With the installation of the faucet, came the installation of the new dishwasher and hooking up the icemaker in the fridge.
3. Got electricity! Yay! So far, my new light fixture has not burned down the house, phew!
4. Installed the remainder of the cabinets, cover panels, and cabinet doors (here's my standard update picture).


5. Installed cap molding to match the mill work on the windows and doorways throughout the house.

Things left on the to do list:

1. Install cap molding on all of the cabinets.

2. Crown and base molding installation

3. Install microwave and range

4. Install butcher block counter top on a small unit next to the stove

5. Install toe kicks under counters

6. Caulk, caulk, and caulk

7. Prime and paint molding

8. Touch up wall paint


The to do list is getting smaller, but these detailed tasks are definite consumers of time. But I'm so pleased with the results that I don't mind the extra time... as long as I get that stove installed, pronto.

6.22.2008

Update in pictures

Tired. Tiled until 2:00 AM last night and got up and at it again at 7:00 this morning. Must go to bed. Here are some pictures for you... words to come later.

Domestikat's pop quiz

I'll give you one guess at what I spent the better part of the day doing today.

Did you guess tiling? Holy crapola, Einstein, you are genius!

I had really really really wanted to lay my tile in a herringbone pattern, but the more I thought about it, the more that seemed like too much trouble. I worried that I might regret not trying it out, but after putting in around 12 hours of tiling today, I realize how time and labor intensive it would have been and I can say that I'm loving my back splash one hundred percent and I have zero regrets.

So far I've done two and a half walls and hope to finish up laying them tomorrow. I'll probably grout them mid-week. You have to see the full effect of the tile with the counter top (and right now the counter top is covered in painter's paper and... you guessed it, cardboard!). When I do my week in review, I'll post a picture that captures it all, but in the mean time, here's a teaser (and can I just say that those little spacer dudes are perhaps the greatest invention of all time).

6.19.2008

Better

So here is my counter top. Le sigh.

And here is the same shot I've been taking all along to show my progress on the kitchen.


If you ever build your own kitchen from scratch, and you use IKEA cabinets and you think, what in the ever-loving world am I going to do with all this cardboard, and then you think, I don't want to ruin my newly refinished floors with all this crazy kitchen building going on, then you should make a cardboard floor. Nice, huh? It's gotten to the point where in some areas I am 4 or 5 layers deep, and that, my friends is when my great idea of a cardboard floor is really a cover-up for my lazy patoot not wanting to take the boxes out to the recycling bin.

The prognosis

Counters aren't level one direction--after a total meltdown that made me cry on the inside, but keep a brave face on for the contractors--we found a solution which did not require me to take the cabinets off the wall and reinstall them. THANK GOD!

The pipe is seeping. It's from cabinet installation (Man of Iron and I were a little aggressive, I guess). So I have to cut a bigger hole around the pipe and my plumber's going to go in with a blow torch and fuse the pipe back together. We all have to hold our breath that the house doesn't catch fire when he does this. He'll be back on Saturday for the operation.

My stomach hurts.

6.18.2008

Counter count down

My do it herselferness (yes, as of now, that's a word) is shining through as of late. Exhibit A) my HVAC solution I posted about yesterday. Exhibit B)the 1/8th of an inch I had to take off of the sink cabinet so I could get the lip of the sink to lie level with the cabinets. Oh boy, what I did to make that happen... it was not pretty. But thankfully, the sink and the counter top will hide any signs of my chisel gouges.


And speaking of counter tops... they get installed tomorrow morning. I can't wait to post pictures. You all will pass out. And I'll have to come over to your house and resuscitate you just so you can take a second look at the amazingness that will be my counters. Thank goodness I'm CPR certified!


Here's one last look at the cabinets sans top.


Oh, and keep your fingers crossed that I didn't break a pipe. I'm having some water issues in the back of the sink cabinet next to one of the pipes. I just noticed it today, so I must have done something yesterday. I have the plumber coming out tomorrow to take a look at it. I so hope I don't get bad news from him and then ruin counter top day!

6.10.2008

Three weeks in review...

Okay, so I've been delinquent in blogging about the house. I'm struggling with a little thing we in the business like to call "burnout." And when I say we, I mean me, and when I say business, I have no idea what I'm talking about.

I'll let you in on a little secret... closer... come closer... closer... I WANT TO BE DONE WITH MY KITCHEN!

So now that I have that off my chest let me recap what I've done.

1. More cabinet assembly--I can put together an IKEA kitchen cabinet in less than 17 minutes. Boo-yah.

2. Cabinet installation and making a refrigerator look like it's built in--Psych. It's a cover panel. Monster and the Commish are quite the installation gurus. The three of us are like the dream team of cabinet installation--as long as we have the right sized drill bit.

3. Complete do it herself HVAC solution--I have a heating vent in the old chimney which is now behind the pseudo wall the Man of Iron and I built. During construction we came up with a good solution for how to get the vent connected to the register that will be in the toe kick of the new pantry (don't worry if that confused you, when all is said and done I'll have a picture of it for you), but our original solution wasn't going to work. So I pretended like I knew what I was doing and ended up with this:
It may not be such a sight to behold, but I will tell you I figured out a solution all by myself--and I taped that puppy up so good that it is tightly sealed. There will be no heat loss there (and I should be putting it to the test now, but I refuse to turn on the heat in mid-June, even if it is 56 degrees in the house...)


4. Baseboard molding--these boards were too tall compared to the rest of the house (needed them around 9 3/4 inches) so the Commish and I ripped them (highly technical term there, people) and then I installed them.

Someday they will be puttied and painted along with the other molding. And can I just say that I'm particularly proud of this little guy that I measured and cut for this funky corner.

The details are going to matter in this kitchen, but they are also driving me nuts. So many little things to do--so little motivation to actually do them these days.

5. Back splash tiling--So I haven't started tiling, but have spent hours upon hours pricing out my tile and delaying my commitment to actually try and replicate this herringbone pattern on the walls.


Someone has a lot of tile cutting and probably cursing in her near future.
I will be kicking it into high gear the next couple weeks, with the goal to have this completed before the end of June--and a possible 4th of July, or maybe Cinqo de July-O party to celebrate.

Have I mentioned that I CAN'T WAIT TO BE DONE WITH THIS KITCHEN?

6.02.2008

Trim-Trimoree, Trim-Trimmoree...

I spent my Friday night and almost my whole Saturday focused on trimming out the three doorways in the kitchen. I'll sand down the wood filler and paint them this week. DomestiKat tired, must go to bed. More stories when I do the week in review (tomorrow). For now, the pictures will need to suffice...

Look Ma!

It's level.
Heck yes I can install cabinets (and now thanks to me, and the crazy Norse engineers at IKEA, so can the Man of Iron, Monster, and the Commish... thanks friends).
Cabinet installation is almost complete. The really important ones are in and are blow-your-mind amazing. Look and see below to see the new cabinets (and just remember, this is how they looked one month ago).


Here's a fun little cabinet--that the Commish and I cursed and cursed when attaching the fancy cover panel too, but it looks so nice now--that will house wine, cookbooks, and other fun trinkets in the drawers (ignore the half assembled lazy Susan, she's just living up to her name).
And here's the space for the new dishwasher. A dishwasher! Yay! I can't even wait. What you can't tell by looking at this picture is the painstaking process it took to make this piece of laminated wood be perfectly level, perfectly sized, and the perfect distance away from the other cabinets. I pretended I was Bob-freaking-Villa and busted out with some ingenious solutions and then the Commish and I rocked cutting that bad boy down to size.You know how sometimes dogs, when they are really excited about something, pee all over. Yeah, I just did that.

5.26.2008

Measure a couple times, drill a couple more

I had a remodel hiatus while I was out of town through the weekend, but I returned yesterday and commemorated Memorial Day 08 by installing and assembling cabinets. My good friends, Monster and the Commish, came over to help. It was so fun--even when I became a major stress case when the Commish used his mitre saw to shorten up some of the trim already installed around the window. But because he is a whiz with the saw and I'm a whiz with drywall mud, you'd never even know we performed a miracle--unless of course you come over to see the kitchen in which case we both will probably tell you about how amazing we are and what we did.
The story I probably won't tell you is about how I forgot how high I wanted to hang the cabinets and accidentally hung them too low the first time. But we considered that a dry run, repeated our steps and rehung them. And except for you, and the next person that remodels this kitchen, nobody will ever know.
Here are the hung cabinets. I am really impressed with us (and with IKEA, which you know I heart), only I don't think these pictures do the work we did today justice. Trust me, the cabinets (even without their doors and hardware) look amazing!
Be on the look out for more cabinet installation updates later this week...

5.19.2008

Week in review (vol. 3)

Floors were refinished.

Other than that it was a low-key week and weekend which allowed me to do some yard work and help my friend the Commish replace a portion of his sidewalk. Heck yes. I added sidewalk making to my personal resume.

Not much will be happening in kitchen land until after the holiday weekend, and then you can expect a few action packed weeks.

5.15.2008

This picture's worth a thousand dollars

Give or take a few bucks. Seriously.

Today was floor day, and that's a big day. Last night after I pulled up the vinyl tiling, I had a moment of dread. When I was getting bids for the floor every person told me there would be no way to guarantee refinishing the floor. But then Kevin came into my life. He's a miracle worker, they say. From everything I heard and read, he is the Midas of fir floors.

But could Midas fix this?


Others said it would be difficult to get the adhesive off, that it would gum up the sander and that it would be nearly impossible. And this morning, when Kevin made a comment to the effect of, "Wow it's really sticky," I began to think it would be impossible. Especially when he taped off a good portion of my dining room. Could he really get it to match the existing floor?
Yes. Yes he can.
The floor is old, so I expected some discolorations, like the one you see by where the old sink was, but I actually like it. Especially because, look! Look how the kitchen is matching the dining room.
Trust Kevin, he does have the touch.

IOU

Here are more of the pictures I meant to upload after the weekend, a couple more views of the paint and the new wainscoted walls:

5.11.2008

Week in Review

Week two didn't see much action until the weekend. On Friday evening, I finished attaching the wainscoting to the new wall covering the old chimney and also applied two coats of primer to the new walls.

Saturday was a day full of painting. Fortunately, I LOVE painting. LOVE it. Unfortunately, I'm ridiculously anal retentive when I paint, which means the result is good, but getting to that point is an intense process. It's best if I'm left alone to this project--in fact, a DIY painting project may have been the first step down the road to splitsville with my ex. Ah, but now I am the boss of my own painting projects, so neener-neener.

Gone is all of the yellow (well, you may see hints of yellow here and there but it will be covered by new moulding or subway tile). These pictures don't do the room justice, but on the walls you'll see Clarksville Grey (it's more of a brownish/greenish/grey), on the ceilings Linen White (quite possibly my most favorite paint color of all time--if you're looking for a beautiful white that's not too stark and has an antique-y feel to it, look no further) and White Dove on the wainscoting. All colors are from Benjamin Moore so they're a little on the spendy side, but are exceptionally high quality paints and beautiful colors (I've painted every room in my house except the bathroom with them).

That concludes my endorsement of Benny Moore's paints--I'll be collecting my check soon.

On the docket for this week:

1. Selling the old range--if not selling it, moving it out of the kitchen to make way for...
2. Floor refinishing on Thursday--this could stretch into the weekend so I'll be moving out for a few days.
3. If there's time, installing some of the wall cabinets--this seems like a HUGE step, one that I'm a little intimidated to take.

Keep your fingers crossed that Kevin the floor man can work the magic he's promised. Can't wait to see the results... stay tuned!

[FYI--More pictures coming, Blogger's not letting me add pictures at the moment, and I'm tired of trying to trick it into letting me do it]

Let there be a light!

After much battling with the light fixture that I love so much, I am proud to say that with little-to-no blood, a heck of a lot of sweat, a few tears of frustration, and one or two minor cursing fits that would have certainly made a handful of Seattle's finest sailors blush, my kitchen has a new light! (And in case you've forgotten, here's what she replaced.)
I'm just going to keep this image burned in my memory and try my best to forget the fact that I just attached that light to really old wiring. And also that when I took out the old fixture lots of stuff (and when I say stuff I mean little critter pellets and maybe things that critters would use to make a nest) fell out of the ceiling. I'm hoping that's all historical stuff and that I don't have any critters living up there now, because quite honestly, it was so hard getting that light up there in the first place that I don't think I have it in me to do it all over again.

And the last thing I'll say about that is that the stuff that fell out of the ceiling was less than one-tenth the size of the stuff I found in my basement earlier this winter, which means whatever was down there must have meant business. And I feel vindicated being wimpy and girlie.

5.04.2008

Week in review

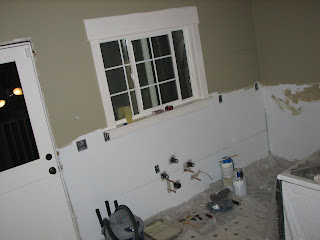
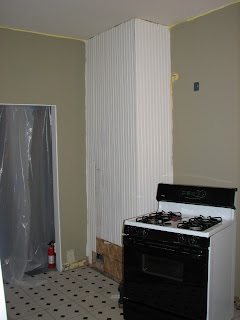
Because I've been thinking about this remodel since I bought the house (actually since my realtor brought me through the first time), it feels like I've been working on this project forever. Granted, I have done a ton of pre-work (buying appliances, setting up contractors, drawing and redrawing plans), but the project really didn't start until last weekend.

That means, it's only been one week, but it feels like it's been months. Maybe that's because so much has already been accomplished. Just one week ago, my kitchen looked like this:


And today, it already looks like this:Here's a little recap of what happened this week:

1. Demolition--104 years of wood and other things ripped off the walls and thrown out on to the deck (which I then neatly organized the next day on my back patio--it brought be great joy to organize the mess). This project was followed by much vacuuming.

2. Installing the new window--I was so freaked out and nervous about that impromptu decision, but I am so glad that the Man of Iron convinced me to do it.

3. More demolition--As the first round of demolition happened, it became apparent that the entire wall needed to go to make drywalling easier. I was hesitant at first, but after spending the better part of the weekend dry walling I realized that made a huge difference. My friend the Commissioner came over and helped (after the wall attacked me) and we knocked that project out in a few hours. Again, much vacuuming followed this project.

4. Plumbing, Electrical, and Door Installation, oh my!--These are three of the four the projects I'm not doing myself (or with the help of others). And I had them all in last week. Guess what followed them? That's right, vacuuming.

5. Insulating the walls--Decked out in layers of protective clothing to keep the fiberglass at bay, I installed insulation. All by myself. Yay.

6. Drywalling--Late Friday, the Man of Iron came over and we got to work drywalling. We worked into the wee hours of the morning, we got tired, he crashed on my couch, we got up early on Saturday and got back to work on the drywalling. There's more to show and tell here, but I'll save that for another post. This called for yet some more vacuuming.

7. Trimming out the windows--more on this in an upcoming post.

8. Cabinet assembly--late Saturday night, the Man of Iron and I started assembling cabinets. The joy of IKEA construction continued today as another friend stopped by and we threw together a few more.

And that, in a brief nutshell, was the first week of kitchen fun. Week number two holds much in store:

1. Finishing mud on drywall

2. Finish wainscoting the new wall.

3. Prime and paint

4. Finish cabinet assembly and start to hang wall cabinets

5. Vacuum (undoubtedly I'll be pulling that puppy out again. I've never vacuumed so much in all of my life)


Word of the day

Code. As in, "My electrical is now to."
Hooray for my electrician who came in and took out some of the scary old wiring, and the even scarier updated wiring that was done quite shoddily.
The beauty of this is I now have an outlet for my stove, as opposed to what I had before...
And, because my electrician is so great, he's installing canister lights on the covered portion of my deck just off the kitchen. I can't wait for summer!

4.29.2008

Presto chango

Now you see the old door...

...now you don't. Holy new door, Batman!Here are a few things I love about the new door:

1. It's black. This just gets me all excited for getting my house painted this summer (note to self: need to book that work...)

2. The only space you can see outside is through the window.

3. You can't feel outside with this door.

4. I didn't have to paint it. Granted it was REEEEEEEEEE-diculously expensive for me to have the installers paint it, but with all of the other work smacking me in the face right now, the fact that I didn't have to bother with doing one more project (for those of you friends--and that was basically everyone I knew--that advised me to save the money and paint the door myself, surprise. I didn't take your advice and I couldn't be happier).

When the installer left today it was everything I had to not hug him around the neck, whisper sweet nothings in his ear, and give him a slobbery kiss of appreciation. However I restrained myself... for the time being. Truth be told, I'm finding it really hard right now to resit the urge to strip down to my skivvies and throw myself at the door. Ooh. That was awkward.

4.28.2008

And this is where I now do my dishes and accessorize

I'm going post crazy tonight (this one is number three, here's one and two). As much as I don't love the fact that I'm washing dishes in my bathroom sink for the next (fingers crossed) few weeks, I do love love love Mrs. Myer's Clean Day products. Might I suggest Lavender or my new favorite (shown above) Lemon Verbena?

If these walls could talk...

... would they be moaning or sighing with relief?

Moaning. This is them down to the studs. "I'm naked, naked."

Siging with relief. Even though they are now down to the studs and feeling naked, this pile is all of the stuff that covered them over the past 104 years (admittedly, I was not sighing for relief when 104 years of gypsum dust, insulation and who knows what was covering every square milimeter of my house).

Moaning. Agh! Look! A hole in my house. A hole in my house that was N-E-V-E-R in the plan. Man of Iron never got the memo that Domestikat finds it extremely difficult to stray from the plan. But wait for it, wait for it...

Sigh of relief. Look. That's the new window. Straying from the plan was actually better than the original plan.

And just for fun, these are the boards I saved because, yes, I will be making kitchen cornhole! out of them. Heck yes, the smurf cupboards will live out their destiny as America's favorite backyard game of skill and strategy and mostly drunken beanbag tossing.